Lomography's Little Lessons: Depth of Field
3 42 Share TweetHave you ever wondered why those nerdy camera constructors formulate complicated terms that baffle most normal citizens? Trust me, I know it all too well; Physics was the first subject to go when I had to choose between studying and spending yet another night pursuing youthful adventures. But don’t worry — the remedy for all of the gaps in your knowledge is right here: Lomography’s Little Lessons on Photography. Follow this series and in no time you’ll catch up on everything your curious mind desires!
DEPTH OF FIELD
After following the breathtaking journey of light rays travelling through the aperture in our last lesson, let’s focus on something less dramatic but just as fascinating; cute animals.
Who hasn’t witnessed the joy of our fuzzy little companions — like a hilarious cat looking as if she sold her brain to the dog next door or some equally adorable moments? Every astute Lomographer will pull out his analogue camera and try to capture those unique moments on film, the thought of the next day’s trending pictures already in his mind’s eye. With the development comes the bitter truth — impatiently we open the Lab envelope just to discover our unique shots being out of focus or our furry friends being ousted by the sharpness of the background.
Let’s finally put an end to those mortifying feelings and do our homework — after this lesson, we eager-beavers will come to know everything about the mysterious Depth of Field. We will reveal not only what it is, but most importantly, how we can control it, so that you perfectly capture the next furry photo op with ease!
WHAT IS THE DEPTH OF FIELD?
The depth of field (we’ll call it DoF from now on) is actually not referring to the size of sweet smelling strawberry fields on a late summer morning — surprise. I like to dream about those Golden Hours, too, but the DoF rather describes the sharp area in a photograph. In other words, a lens can only focus on one exact distance at a time:

Nonetheless, a certain area behind and in front of the focus appear sharp because the gradual decrease of sharpness is imperceptible to a certain extent. Hence, we can say that the DoF is the distance from the nearest to the farthest points that appear acceptably sharp in a photograph. This area is called the field.

Let’s rehash some of the basics we have already discussed. Below, you see the simplified construction of a camera and the light rays that are streaming into the camera body. Those light rays are the key to understanding not only the aperture, but also the DoF.

As we already discovered last time, the size of the area that appears sharp in a picture is related to the angle in which light rays are entering the camera and thus to the angle in which they are emitted by the object we shoot. When we focus on the enthralling brown eyes of that little squirrel, everything within a certain distance behind and in front of them will appear crisp and clear depending on how fast or slowly the light rays are spread out from the focal point. To achieve a shallow DoF, we therefore have to aim for a wider angle of diffusion, while a sharper angle will lead to a deeper DoF.

HOW CAN WE CONTROL THE DEPTH OF FIELD?
Now that we know all these theories about the DoF, what does it look like in the real world? How can we influence the angle in which those light rays are finding their way into our camera and onto our award-winning shot? Well, it is actually quite simple. To adjust the angle in which the light rays fall onto the lens and consequently also the DoF, we have basically three parameters that we can work with: the distance between the camera and the subject, the focal length and the aperture.
Distance
Firstly, let’s have a look at the easiest and most obvious of the three methods — distance. When we alter the distance between the object we shoot and our camera lens — by sneaking up to the squirrel delighting in a famous LomoCoke — the light rays will spread out faster and we can achieve a shallower DoF. On the other hand, if the little thing gets scared and jumps back from us, the distance will grow and so will do the DoF.
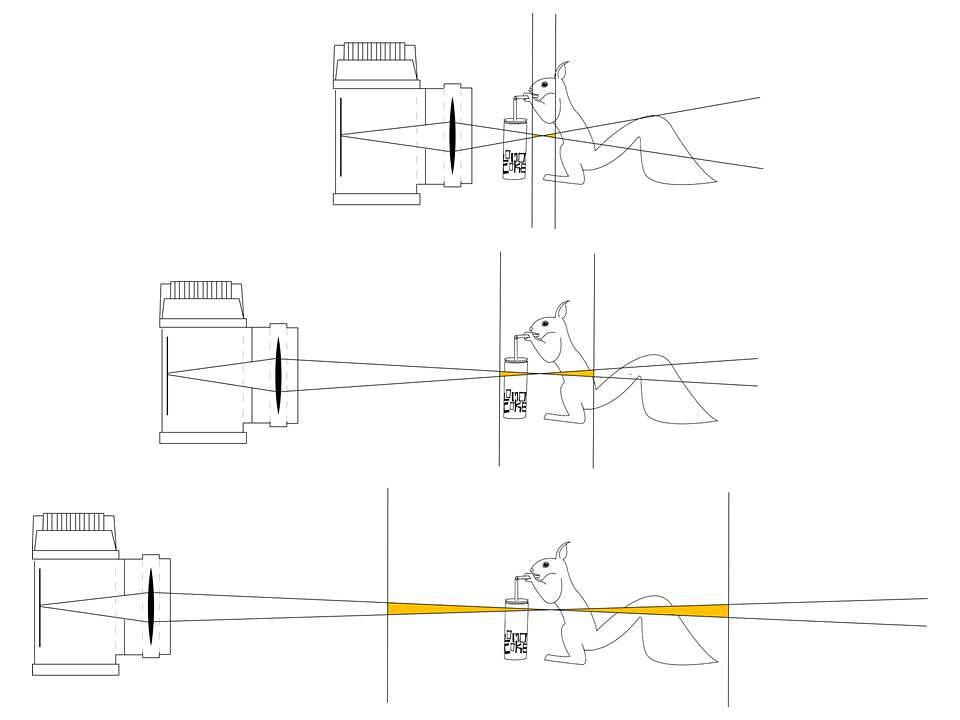
Focal Length
Unfortunately, we are not always shooting on wide lawns where we can move back and forth the way we want. We therefore have two other options to increase and decrease the DoF without actually having to move either our camera or the skittish gnawer. If we can influence the light ray’s angle by changing the distance between the lens and the object we’re shooting, we can just as well influence it by differing the distance between the lens and the film sheet. This distance is called the focal length:

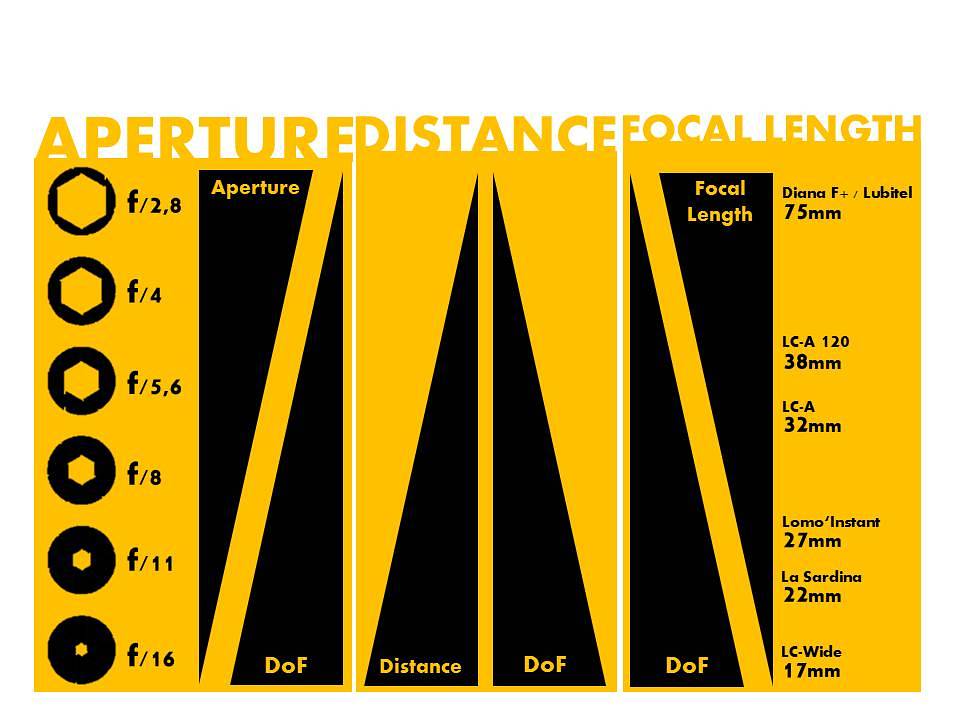
Below you can see how the DoF can vary drastically depending on the camera you use. Sure, the everyday Lomographer is not touring around with a telephoto lens in his pocket, but sometimes it is already enough to switch from the wide angled La Sardina to one of our medium format champions which have a larger focal length.

Aperture
Now, don’t get desperate — even if you don’t have a luxurious selection of Lomographic gear to choose from, or you just don’t feel like hopping around all the time, there is a third option! Easily the most comfortable technique for anyone equipped with a camera with manual controls, the third and final option we also discovered in our first lesson — we can achieve a shallower or deeper DoF with a handy tool called the aperture.
Just like a human eye, a camera has an iris. The iris is a circular shield with a hole inside that can open and close to various diameters. This hole is called the aperture.

By opening and closing the aperture, we can change the angle in which the light rays enter the camera body, without having to change our position or our camera. Thus, a smaller aperture, meaning a higher f-stop number, leads to a deeper DoF while a larger aperture, meaning a lower f-stop number, will lead to a shallower DoF.

If you’re feeling a bit lost at the moment, we recommend you to go through our first Little Lesson to understand the aperture in detail and to find out the connection between the f-stop number and the size of the aperture.
To sum things up, here is a little breakdown of all the connections we have brought to light:
Congratulations, after all you learned how to control the DoF and should now be able to achieve the photographic results you have always been striving for! It may take a bit to fully absorb and perfectly apply all of this knowledge, but try it out and practice your skills and continue to enrich our photo archives with your beautiful shots!
written by jennifer_pos on 2015-04-10 #gear #tutorials #lifestyle #aperture #exposure #lesson #tipster #depth-of-field #focus #focal-length


3 Comments